| Most viewed - The Adventure of Link |

z3-shadow.jpgShadow4471 viewsSources: Image from the Official Link to the Past Nintendo Player's Guide. Scanned and Edited by Melora. The Illustrator was possibly Katsuya Terada. Notes: I had to think about where I wanted to place this image. Since it was from the LttP guide, but was illustrating back story for AoL, I decided on this section.Melora
|
|

z3-thunderbird.jpgThunderbird4300 viewsSources: Image from the Official Link to the Past Nintendo Player's Guide. Scanned and Edited by Melora. The Illustrator was possibly Katsuya Terada. Notes: I had to think about where I wanted to place this image. Since it was from the LttP guide, but was illustrating back story for AoL, I decided on this section.Melora
|
|

z3-link-fighting-goriya.jpgLink Fighting Goriya4204 viewsSources: Image from the Official Link to the Past Nintendo Player's Guide. Scanned and Edited by Melora. The Illustrator was possibly Katsuya Terada. Notes: I had to think about where I wanted to place this image. Since it was from the LttP guide, but was illustrating back story for AoL, I decided on this section. -I think that's prob. a goriya...Melora
|
|

z4-magic.jpgMagic4156 viewsSources: Image from the Official Link's Awakening Nintendo Player's Guide. Scanned and Edited by Melora. Notes: I had to think about where I wanted to place this image. Since it was from the LA guide, but was illustrating back story for AoL, I decided on this section.Melora
|
|

z4-battle.jpgBattle3862 viewsSources: Image from the Official Link's Awakening Nintendo Player's Guide. Scanned and Edited by Melora. Notes: I had to think about where I wanted to place this image. Since it was from the LA guide, but was illustrating back story for AoL, I decided on this section.Melora
|
|

z3-boss.jpgHorse Head3655 viewsSources: Image from the Official Link to the Past Nintendo Player's Guide. Scanned and Edited by Melora. The Illustrator was possibly Katsuya Terada. Notes: I had to think about where I wanted to place this image. Since it was from the LttP guide, but was illustrating back story for AoL, I decided on this section.Melora
|
|
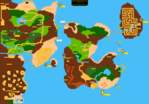
overworld.png3618 viewsCredit for this map goes out to ReyVGM of VGmuseum.com. Thanks!lord-of-shadow
|
|

z3-enchanted.jpgEnchanted3577 viewsSources: Image from the Official Link to the Past Nintendo Player's Guide. Scanned and Edited by Melora. The Illustrator was possibly Katsuya Terada. Notes: I had to think about where I wanted to place this image. Since it was from the LttP guide, but was illustrating back story for AoL, I decided on this section.Melora
|
|

z3-links-mark.jpgLink's Mark3577 viewsSources: Image from the Official Link to the Past Nintendo Player's Guide. Scanned and Edited by Melora. The Illustrator was possibly Katsuya Terada. Notes: I had to think about where I wanted to place this image. Since it was from the LttP guide, but was illustrating back story for AoL, I decided on this section.Melora
|
|

linkdepart3.jpg3348 viewsBetter version of the above image.
|
|

linkdepart.gif3087 viewsLink departing on his quest.
|
|

z3-crystal.jpgCrystal Statue3086 viewsSources: Image from the Official Link to the Past Nintendo Player's Guide. Scanned and Edited by Melora. The Illustrator was possibly Katsuya Terada. Notes: I had to think about where I wanted to place this image. Since it was from the LttP guide, but was illustrating back story for AoL, I decided on this section.Melora
|
|

z2manual-03-04.jpg2918 views
|
|

z2manual-11-12.jpg2577 views
|
|

z2manual-07-08.jpg2561 views
|
|

z2manual-13-14.jpg2560 views
|
|

z2manual-05-06.jpg2538 views
|
|

princewizard2.jpg2447 viewsBetter version of the above image.
|
|

z2manual-09-10.jpg2438 views
|
|

molblins2.jpg2330 viewsBetter version of the above image.
|
|

z2manual-17-18.jpg2253 views
|
|

z2manual-19-20.jpg2250 views
|
|

impadoor2.jpg2222 viewsBetter version of the above image.
|
|

z2manual-15-16.jpg2165 views
|
|
| 876 files on 37 page(s) |
 |
1 | |
|
|
|
|
|
|
|
|
|
|
|
 Register